
Positive Pay is basically fraud protection for the checks you cut. Every time you issue a check, NetSuite generates a file listing it out (amount, date, check number) and sends it to your bank. If someone tries to cash a check that doesn’t match what’s on file, the bank flags it before it clears instead of after. It runs through the Electronic Bank Payments (EBP) SuiteApp (free NetSuite app).
Here’s what it covers and how to get it running.
What Formats Are Supported
Out of the box, NetSuite ships with three Positive Pay templates, and you don’t need an EBP license for any of them:
- BoA/ML (Bank of America Merrill Lynch)
- RBC (Royal Bank of Canada)
- SVB-CDA (Silicon Valley Bank, Controlled Disbursement Accounts)
If your bank uses something else, you’re not stuck. You can build a custom Positive Pay template with FreeMarker syntax, no license needed for that either.
Prerequisites
Before installing the EBP SuiteApp, make sure these features are enabled: Item Options, Custom Records, Client SuiteScript, Server SuiteScript, Accounting Periods, and Advanced PDF/HTML Templates.
If you’re planning to use EBP for full electronic payments (not just Positive Pay) across countries, you’ll also need an active EBP license and the NetSuite SuiteApps License Client bundle (Bundle ID 116144) installed first. The EBP license is a paid license. However if you are going to use just Positive pay and electronic payments within the United States, the free NetSuite app will suffice.
Installing the SuiteApp
Install Bundle ID 533070 (Electronic Bank Payments) in Production. It’s a managed bundle, so NetSuite updates it automatically once it’s live there. Sandbox doesn’t auto-update though, you have to go update it manually, if desired.
After installing, go to Payments > Setup > Electronic Payments Preferences, click Edit, set your email templates for vendor and customer payments, and save. Easy step to miss, and it’ll bite you later if you skip it.
Roles and Permissions
Installing the bundle adds a Custom EFT role you can assign to whoever’s processing payments. If you build your own role instead, base it on Custom EFT and give it at minimum View access to the standard transaction and list permissions (Bills, Checks, Customer Refund, Vendors, etc.), plus Edit access to Company Bank Details, Bank Details, Format Details, Payment Aggregation, and Payment File Format. Payment File Administration needs Edit level too since that’s where the generated files land.
By default only Administrators get setup permissions (installing the app, customizing formats, creating bank records), so if you want someone else doing that work, you’ll need to build it into their role specifically.
Setting Up Your Company Bank Record
This is the part that actually ties your bank account to a Positive Pay format. Go to Payments > Setup > Bank Details > New.
Fill in Name, GL Bank Account (the account your issued checks post to), Legal Name (shows up in the file), Print Company Name (shows on payment notification emails), Positive Pay Template (pick BoA/ML, RBC, or SVB-CDA), and File Cabinet Location ID for where the generated files land. File Name Prefix is optional.
Save, then on the Positive Pay Template Details subtab enter your bank account number. BoA/ML wants 12 digits (pad with leading zeroes if yours is shorter), RBC wants 10.
One thing NetSuite’s pretty clear on: don’t create these bank records through CSV import or SuiteScript. Do it through the UI so the field sourcing and validation actually work right.
Generating the File
Once the bank record’s set up, go to Payments > Cheques > Positive Pay to generate a file.
Select your Bank Account, that auto-fills the format and max payments allowed. Set a Date From/To range for the checks you want included, and optionally a Cheque From/To range by check number. There are checkboxes for including voided checks (the ones reversed through a reverse journal entry) and excluding ones that already cleared your bank register.
It’s not just Check transactions either. Positive Pay also picks up Bill Payment, Customer Refund, Cash Refund, Paycheck, Sales Tax Payment, and Vendor Prepayment, as long as they’re paid by check.
Hit Submit and NetSuite creates a Payment File Administration record. Click Refresh on it until the file finishes processing, then grab the download link in the File Reference field. That’s what you upload to your bank’s Positive Pay portal or send over.
Quick note: if Maximum Payments in File shows zero and nothing populates in the transaction list, check the Maximum Lines field on the underlying Payment File Format record, it can’t be blank.
If Your Bank Isn’t on the List
For anything outside BoA/ML, RBC, or SVB-CDA, build a custom template at Payments > Setup > Payment File Templates > New. Set Payment File Type to Positive Pay. Maximum Lines is capped at 1-5,000 (blank or zero won’t return any transactions). You write the file body in FreeMarker syntax, and you can add custom reference fields to the bank record if your bank needs extra identifiers. Once that’s built, it plugs into the same bank record setup and file generation flow above.
That’s the whole loop: install and configure it once, then it’s just a Bank Account and a date range every time you need a file for the bank.
Taking It to the Next Level
You don’t have to touch this process by hand forever. If your bank can give you SFTP access, the EBP SuiteApp has a built-in Outbound Configuration record that handles the file transfer for you, no custom scripting needed.
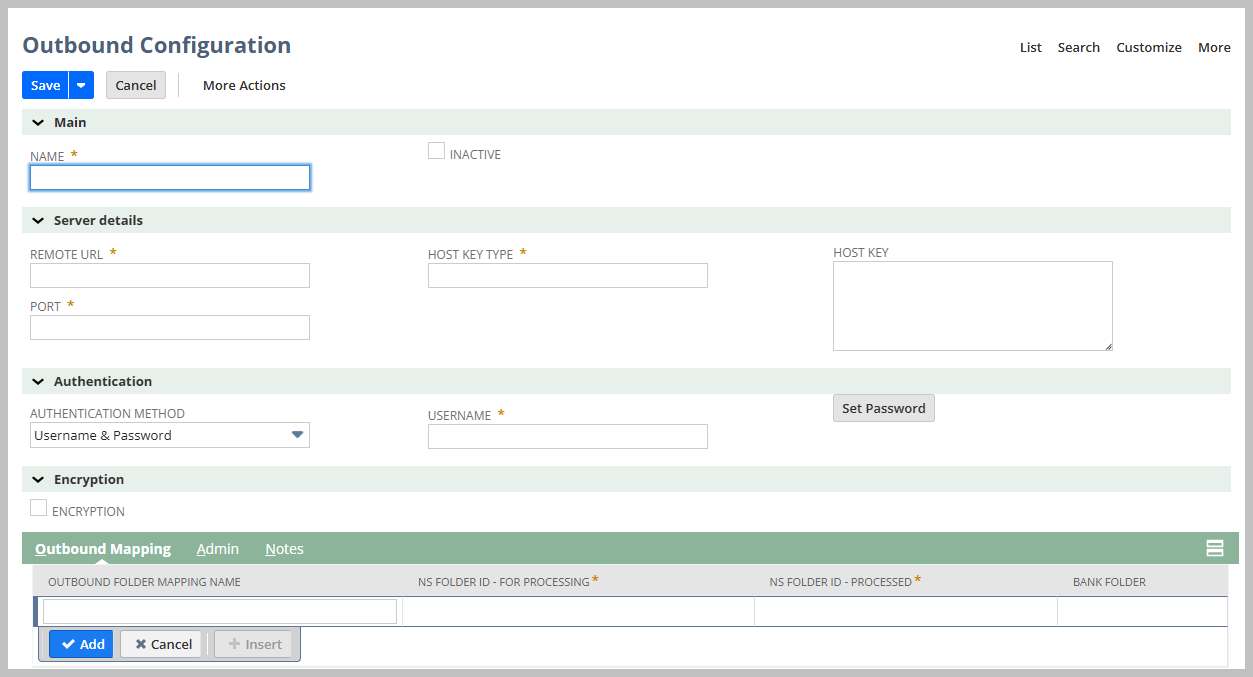
Set up a new Outbound Configuration record and give it a name. Under Server details, enter the bank’s Remote URL, Port, Host Key Type, and the Host Key itself. Under Authentication, pick your method (Username & Password is the default option) and enter the username, then use Set Password to store the credential securely rather than typing it anywhere else. There’s an Encryption checkbox too if your bank requires it.
The part that actually moves the file is the Outbound Mapping subtab. You map an Outbound Folder Mapping Name to an NS Folder ID – For Processing (where NetSuite drops the Positive Pay file once it’s generated) and an NS Folder ID – Processed (where it gets moved once it’s been sent), plus a Bank Folder if the bank wants the file delivered to a specific path on their end.
Pair this with the Payment Schedule feature and the whole thing runs on its own: the file generates on schedule, lands in your processing folder, and NetSuite ships it straight to the bank’s SFTP server. No manual downloads, no manual uploads.
This one’s a Setup screen, not a scripting project, so it’s a lot less work to stand up than it sounds. Once it’s configured, Positive Pay stops being a manual task altogether.
Setting this up and it’s not cooperating? The first hour is free. Bring us the file that won’t generate or the bank that’s rejecting it and we’ll work it in your account.